Physics of Momentum Scrolling
Why would anyone want to re-implement scrolling in a browser? In modern times, the answer should be no-one. But it turns out, not quite.
When developing one of my projects — Reflect calendar, I encountered an issue with iOS Safari's scrolling— whenever you update/create scrollable element via setting innerHTML of its parent, scrollable field doesn't get its "scrollability" immediately. Sometimes you drag the whole screen instead of dragging only scrollable area's content.
This problem also manifests itself when you're dragging the whole screen by some element outside of scrollable area, and then trying to scroll inside that area. You should wait until the whole screen "settles down" and approximately one more second to do that. Looks like this problem has a name — "overscroll".
Now, is it really worth a concern doing something about it? After all, native implementations should be the best, right?
Here's where we fall into this "uncanny valley" of UI. Say, you want your web-application to feel "native" as much as it reasonable in mobile web browser. But, with things like overscroll happening, a user will notice that it's not nearly as native as iOS gives you through UIScrollView.
Sure, if you want native, you'd go with React Native and all, but why not push it to the limits when it's possible? And in modern web — it's totally possible. Moreover — it has been done! By Ryan Fioravanti, for Gmail web version for iOS (which means two separate versions for iPhone/iPod and iPad). Here's the article by Ryan. I suggest you read it — it's excellent. It was done for another reason — Safari didn't have position:fixed back then, and overflow-scrolling: touch had yet to come.
Anyway, let's dive into the article and see whether it's possible to implement momentum scrolling in JS as close to the native as possible.
We're discovering immediately that Ryan's solution is based on transitions — the simplest possible animations. And another good part that these particular transitions are hardware accelerated — the ones that animate opacity, translation, rotation and scaling. So, basically, making scrolling through transitions comes down to prepare right end state, commit it to the element which will be scrolled and then give it proper transition flavor, so that element will move its way gracefully and up to a user's expectations.
First, let's show what momentum scrolling will look in the end.
Ryan's article describes the basic DOM setup, drag'n'drop part via touch events and translate3d transform property. The drag and translate parts should be fairly intuitive. Now, the heart of logic is this method — doing momentum whenever user releases touch with some velocity prior to that.
rflect.ui.MomentumScroller.prototype.doMomentum = function() {
    var velocity = this.getEndVelocity();
    if (velocity != 0) {
        var acceleration = this.getAcceleration(velocity);
        var displacement = - (velocity * velocity) / (2 * acceleration);
        var time = - velocity / acceleration;
        var newY = this.contentOffsetY + displacement;

        if (this.positionIsOutOfBounds(newY)) {
            this.setUpTransitionStage1();
        } else {
            let transition =
                rflect.browser.css.getSelectorCasedProperty('transform') + ' ' +
                time + 'ms cubic-bezier(0.33, 0.66, 0.66, 1)';

            rflect.browser.css.setTransition(this.element, transition);
            rflect.browser.css.setTransition(this.getScrollBarContainer(), transition);

            this.contentOffsetY = newY;

            rflect.browser.css.setTransform(this.element,
                `translate3d(0, ${newY}px, 0)`);

            rflect.browser.css.setTransform(this.getScrollBarContainer(),
                `translate3d(0, ${-(newY / this.getSizeRatio() -
                this.getScrollBarLineHeight() / 2)}px, 0)`);
        }

        this.isDecelerating_ = true;
    } else {
        this.showScrollBarDelayed(false);
    }
}
As you can see, here we're doing: getting end velocity of user's touch (line #2), calculating displacement (line #7) and time (line #8). Then we're updating element with new position (line #28) via translation. And, finally, in order for movement to look natural, we're applying proper transition (line #21) to scrollable element. This transition function is cubic-bezier(0.33, 0.66, 0.66, 1) and is kindly given by Ryan.
Let's take a moment and reconsider this more carefully.
First, some theory and formulae for accelerated movement:

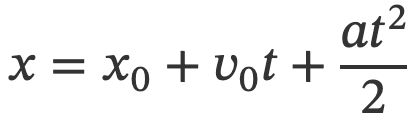
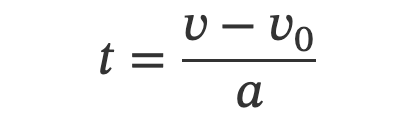
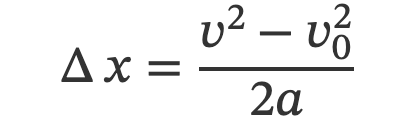
The last formula (Fig. 4) is derived from formula on Fig. 2 by moving x minus x0 to the left and replacing time by expression in Fig. 3. So we're using these formulae to get displacement and time in the doMomentum function, nothing particularly special.
Now that we know how far and how long our movement will take, it's time to apply proper transition to this movement. Fortunately, Ryan gives us one — cubic bezier for slow deceleration ending in full stop (velocity is zero).
So now we have basic implementation of how content will behave should it decelerate to zero velocity.
Also, quite simple is the returning content from out of bounds position to frame. Here's how it looks.
Implementation of this method is here.
rflect.ui.MomentumScroller.prototype.snapToBounds = function() {
    const transition = rflect.browser.css.getSelectorCasedProperty('transform') +
        ' ' + 500 + 'ms ease-out';

    this.setTransitionAll(transition);

    // Different out of bounds cases:
    // 1. If content is lower than frame upper border
    if (this.contentOffsetY > 0) {
        this.contentOffsetY = 0;
        rflect.browser.css.setTransform(this.getScrollBarContainer(),
            `translate3d(0, ${(this.getScrollBarLineHeight() / 2)}px, 0)`);
    }
    else {
        // 2. If content is higher that frame lower border.
        this.contentOffsetY = this.getLowestContentPosition();
        rflect.browser.css.setTransform(this.getScrollBarContainer(),
            `translate3d(0, ${this.frameElementSize.height -
            this.getScrollBarLineHeight() / 2}px, 0)`);
    }

    rflect.browser.css.setTransform(this.element,
        `translate3d(0, ${this.contentOffsetY}px, 0)`);

    rflect.browser.css.setTransform(this.getScrollBarLine(),
        `scaleY(${this.getScrollBarLineHeight()})`);

    this.isDecelerating_ = true;
}
As you can see, it is simply detection of whether we're out of bounds and then applying transition to return content into frame. Transition function is simple ease-out and time is constant 500ms.
Now the most complex case is left — when deceleration takes content out of bounds. In this case, we have three stages with separate transition each:
- Transition that takes content exactly to bounds.
- Transition that takes content from the edge to zero velocity.
- Transition that returns content to bounds (snapToBounds).
To better illustrate this, here's a visualization.
Actually, part 2 is simple deceleration to zero velocity, which we've already implemented.
The interesting part is 1 — we need to translate content with non-zero velocity left in the end. This requires us different bezier function, but which one? Ryan laconically mentions that this case is outside the article's scope.
This is apex point of my research in this problem and it brought me incredible satisfaction to finally find the answer! The feeling which, I believe, each engineer is striving for.
Turns out, the look of function will be different for each end velocity. Let us illustrate it by this pictures.

- On first picture, there's an edge case — deceleration takes content to zero end velocity.
- On second, end velocity is bigger than zero.
- On third, end velocity is the same as start velocity.
So you see the relation here — the less end velocity will differ from start velocity, the more flat cubic bezier function will be, up to the limit of simple line (cubic-bezier(.33,.33,.66,.66) or linear). The maximal difference between start and end velocity is when end velocity is zero. In this case function will be cubic-bezier(0.33, 0.66, 0.66, 1). And in any case in between, the function will look like cubic-bezier(0.33, 0.66-x, 0.66, 1-x) where x = abs(endVelocity/startVelocity).
So we're finally here! The demo of working implementation could be seen here(should be visited from iOS device or you can simulate it with dev tools).
Thank you for your attention.